

Watering system with NodeMCU (ESP8266, ESP12E)
- July 16 2017
- ESP32, ESP8266, NodeMCU, Wemos ...
- 5668 Reads
- 0 Comments

If you follow me on social networks (facebook, twitter and google plus) maybe you saw a few posts which I shared. My the latest project is watering system with popular WiFi chip called ESP8266, ESP12E module, NodeMCU development board.
This project was made like watering system for a few plants during summer vacations.
Plant irrigation should be smart. The easiest way how to irrigate plants is sometime turn on the water pump (or water valve).
This way has a lot of disadvantages like the watering device doesn't check if it rains. Then is not neccessary to irrigate plants.
The device doesn't know if the plant has enough water or not.
Sometimes the watering device can water the plant in time when it is so hot. The plant can perish.
So, this way is not good way. This Watering system with NodeMCU is smarter and better.
The watering system checks current time, soil moisture, and you can add temperature/humidity sensor like Si7021.
The result if is neccessary to irrigate the plant dependes on two conditions. At first, the irrigate time. You have to set time range when the plants can be watered. For example 9pm to10pm. The program knows 24 hours per day, not 12 hours per day. So be careful what you fill. You can use this online calculator.
The time range has two values, start (WATER_TIME_MIN) and end (WATER_TIME_MAX) of time range.
At second, the watering device with NodeMCU (ESP12E) has second condition - value from soil moisture sensor. Fill the minimum value (SOIL_MOISTURE_MIN) when the device can irrigate the plants. The program also contains hysteresis of value (SOIL_MOISTURE_HYST).
You can buy the Soil Moisture sensor on ebay or aliexpress for one USD. The analog output of Soil Moisture sensor is connected to analog input of NodeMCU development board.
My minimum value is 650 (650mV), the moment when plant can perish because the soil moisture is too low.
The design of watering system contains two outputs which are galvanic isolated. The device is switched through relay.
The maximum swithing voltage is 200V and switching current is 500 mA. Thanks to two independent outputs you can make two watering circuits. E.g. The first for herbs and the second for vegetables.
Important notes:
The main component is ESP8266 modul (NodeMCU)which is powered from external power supply through 7805 voltage regulator. The NodeMCU development board cotains own voltage regulator on 3.3V. The logic 1 on output (GPIO) is maximum 3.3V.
The voltage is not enough for full switch of transistor (switching mode of transistor). I chose special transistor called IRLML2520 (HEXFET technology). N-MOSFET transistors are used for switching directly from GPIO of microcontrollers.
The design contains jumper for set of control coil voltage of relay. You can choose 5V (output of 7805) or input voltage (12V in my case). The design contains the place for protective diode of transistor. My relay includes protective diode inside.
The next jumper is used for connecting of RESET pin and D0 GPIO. It is used for wake up of NodeMCU after sleep down mode.
The soil moisture sensor has to be placed very smartly. Be careful where the sensor will be placed. It is imporant for measurement. The sensor shouldn't be placed so far from water tube and neither so close to water tube.
Firmware:
As I mentioned above, after the check of current time and enabled time range, the firmware continues to next condition. Value of soil moisture sensor.
If both conditions are true, the water pump (or water valve) is turned on. Water time is output1Delay variable.
After this time, device goes to sleep. Sleep time is SLEEP_DELAY_IN_SECONDS variable.
For example: SLEEP_DELAY_IN_SECONDS is 60s, output1Delay is 10s.
The device is waked-up every 60s, after that checks current time and value from soil moisture sensor. If both conditions are TRUE, the device on output1 is turned on for 10s. This process is repeated until one of two conditions is not TRUE.
This way has one big advantage. On the plant is not to much water and also the water is soaked up during the sleeping of NodeMCU.
The code for NodeMCU (ESP8266) is also available on github of project and you can modify it.
Conclusion:
The device, I mean only the board, was tested 3 days and during this test time wasn't find any error. The device switched only LED instead of water pump.
The problem was found during final assembling. The water pump is not so powerful. So, the water pump can't pump up to 0.5m where is fork to another water ways,
In the next version I have to modify water supply, buy more powerful water pump, make 3D case for this device and write code for Si7021 (temperature/humidity sensor).
Thanks to using ESP8266 you can easily write code for sending data to webserver.
The board is designed in eagle CAD.
All project is available on github https://github.com/petus/NodeMCU_watering_system
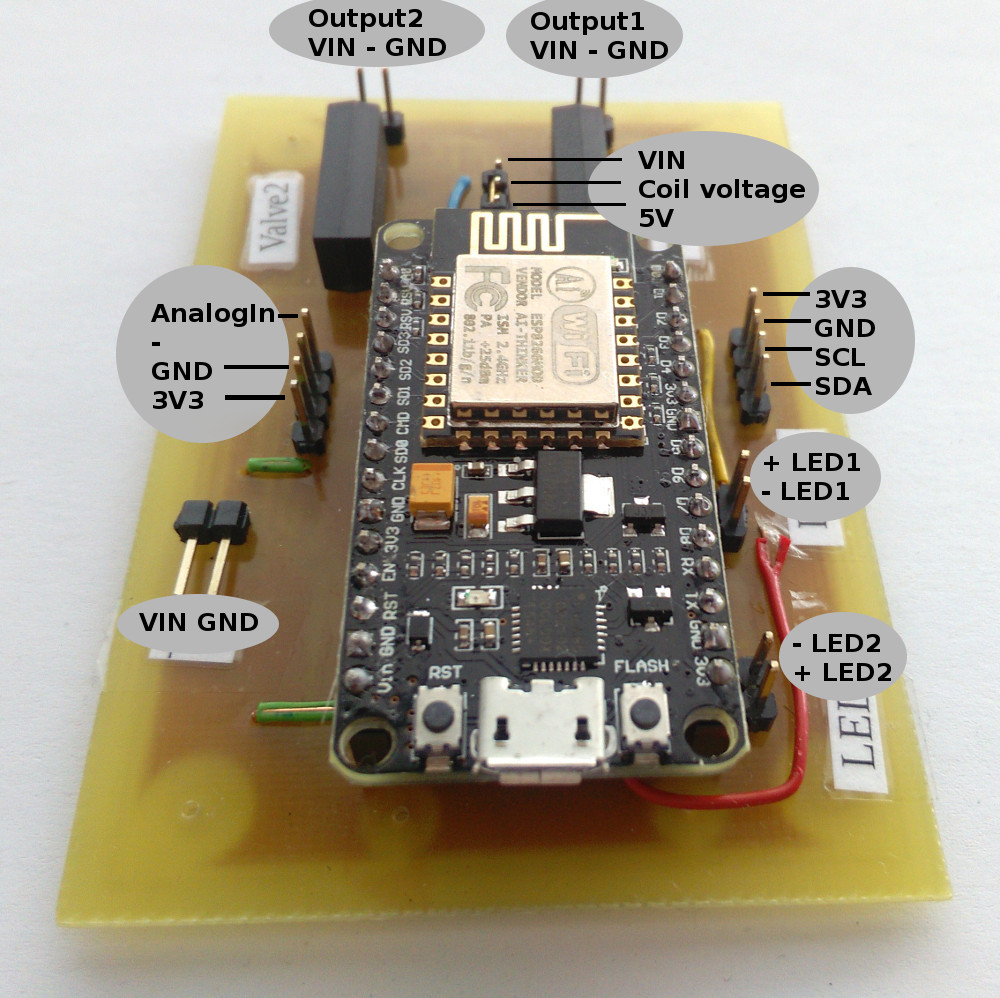
Description of board

Pinout of board:
Schematic of board:

PCB:
