

Weather station with ePaper and weather data from OpenWeatherMap
- September 10 2019
- ESP32, ESP8266, NodeMCU, Wemos ...
- 14485 Reads
- 0 Comments
The weather station is the first DIY project which makers do after sometime of playing with electronics.
It is project which is helpful and makers using this long time.
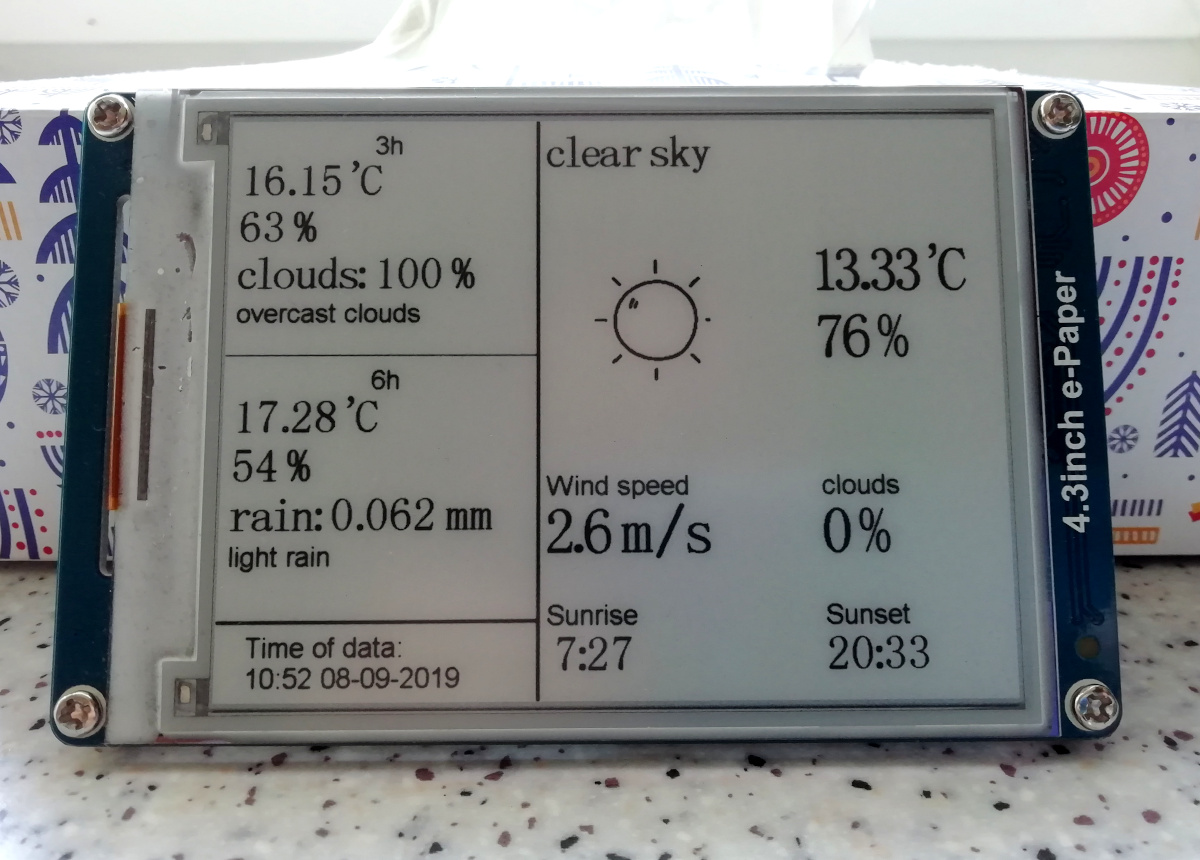
This article introduce my weather station which is based on board with ESP8266, the display is ePaper and the data for current weather and forecast are receiving from OpenWeatherMap which provides also API for free.
Introduction
The advantage of this display, ePaper, is mainly very high contrast and zero power consumption outside of updated time (in updating time it is around 80 mA for 4 seconds).
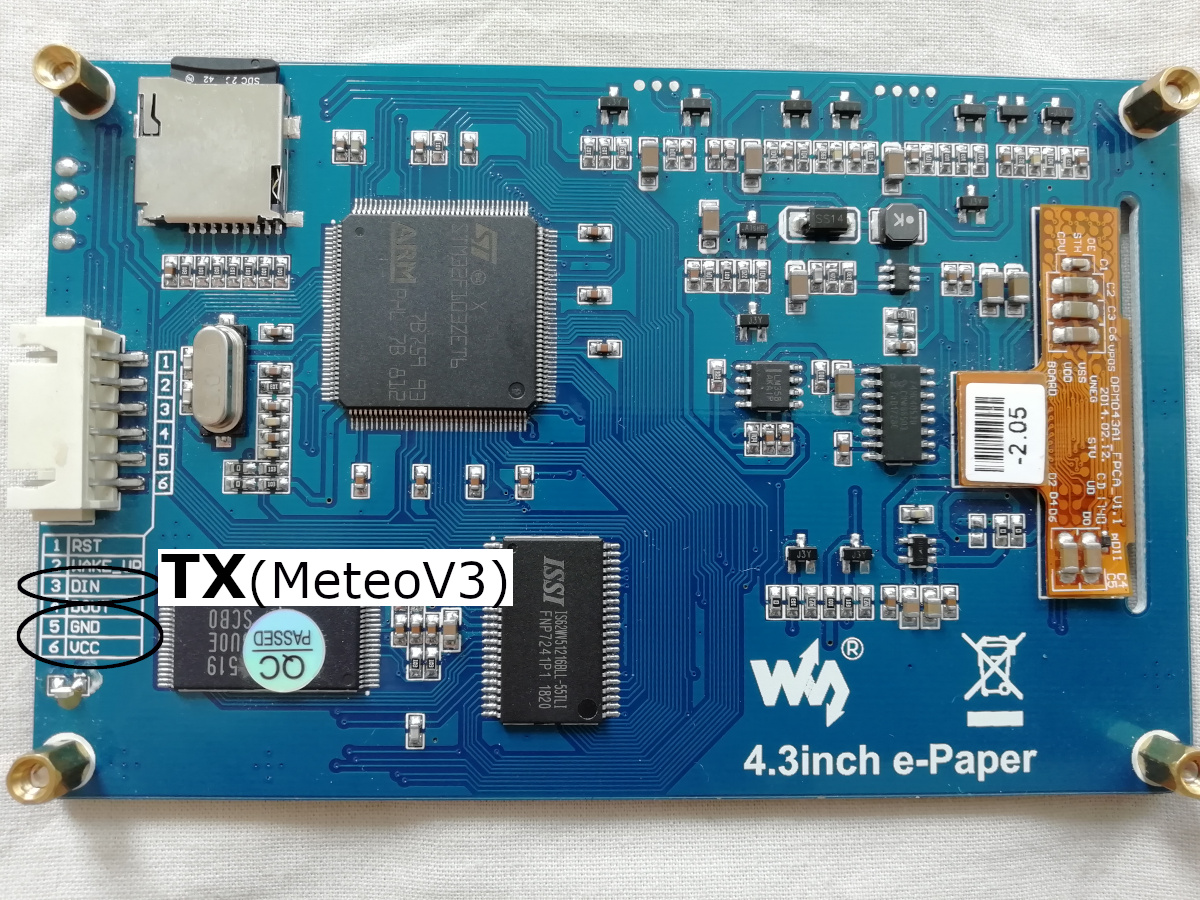
Unfortunately, it is not the case of this ePaper - 4.3" with UART bus (SPI is usual in others variants), microSD card slot, big external FLASH, and microcontroller which controls communication with host controler (your device) and ePaper.
It means, the power consumption during the sleep mode is a few mA (I measured 3mA).
On the other side, there are really BIG advantages - easier communication, possibility of saving of pictures and fonts thanks to microSD card and big amount of FLASH memory AND if you disconnect the power, you get both advantages - zero current and big FLASH and UART bus.
Used parts:
4.3" ePaper with resolution 800x600 - https://www.dfrobot.com/product-1312.html
MeteoV3 board - https://time4ee.com/articles.php?article_id=121 (you can buy a bare PCB)
Power shield for MeteoV3 - https://github.com/petus/Meteo-v3-ESP8266/tree/master/Design%20Files/PowerShield_Meteo-v3.1 (bare PCB for free with each order on tindie)
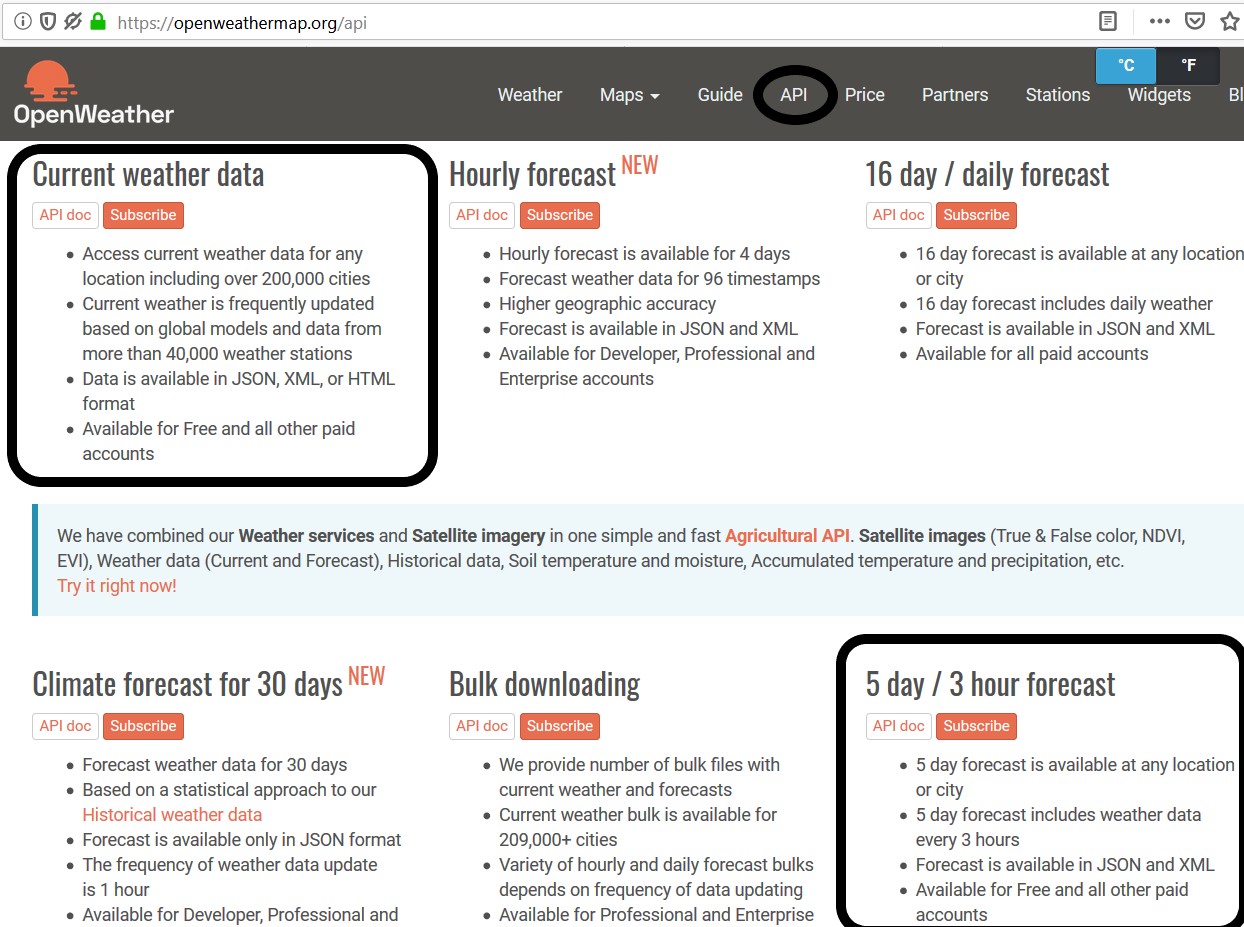
As forecast and current weather, you can use a few weather services - yr.no, wundergroudn.com and othres. I used API from OpenWeatherMap.org.
Activation of account of OpenWeatherMap
After registration for this weather service, you can enable API which is free.
The free account offers up to 60 request per 1 minute for current weather and forecast for 5 days (splited on 3hours timeslots), UV index and alarms.
The data are updated at least every 2 hour. Usual around every 30 minutes.
Libraries which are needed
For using of ePaper, forecast and board with ESP8266 (in Arduino IDE), you have to install a few libraries.
ESP8266 - https://github.com/esp8266/Arduino. For MeteoV3, choose NodeMCU v1.0
OpenWeatherAPI - https://github.com/sfrwmaker/openweathermap.org-ESP8266
Json - https://arduinojson.org/
JsonParser - https://github.com/squix78/json-streaming-parser
Arduino ePaper library - https://github.com/Arduinolibrary/DFRobot_E_paper/blob/master/epd.zip (wiki)
Original Icons which I modified - https://www.iconfinder.com/iconsets/weather-413
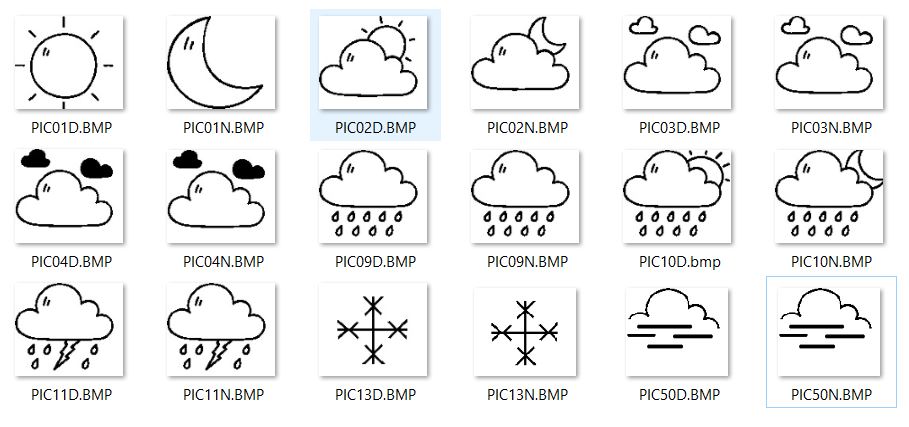
Icons for weather
OpenWeatherMap ("OWM") is sending current icon for current weather (the list of icons name is here).
My storage for icons is microSD card where I saved icons in BMP format. Based on identifier of icon from OWM, the firmware choosesfshow equivalent icon from my list of icons and displays that on ePaper.
The microSD card has to be formated on FAT32 and names of files (pictures) has to be 10 chars at maximum (with type of file - bmp in my case).
I named the icons same like on OWM.
My modified icons are available on on this link in ZIP.
Firmware
The important parts of code are following:
ow_key - API key for OWM (available on OWM)
nodename - name of device (optional)
wifi_ssid - SSID of your wifi network
wifi_passwd - Password to your wifi network
const char *ow_key = "----";
const char *nodename = "---";
const char *wifi_ssid = "----";
const char *wifi_passwd = "----";
0 - loading of pictures and fonts from external FLASH
1 - loading of pictures and fonts from microSD card
epd_set_memory(1); // microSD card
Turn on and off the ePaper by GPIO of MeteoV3. I used PowerShield for MeteoV3 which is able to connect/disconnect the power and you can choose what GPIO will be used - GPIO 12 (in my case), or GPIO 14.
digitalWrite(12, HIGH); // turn on the ePaper
digitalWrite(12, LOW); // turn off the ePaper
Loading of fonts
epd_set_ch_font(GBK32);
epd_set_en_font(ASCII32);
Loading of variables from OWM API as String. It is versatile using and there isn't depending on types of variable. All of them are converted to String.
String sCond = "" + String(ow_cond->cond) + "";
sCond.toCharArray(buf, 50);
epd_disp_string(&buf, 610, 370);
Write icons on ePaper
epd_disp_bitmap("PIC01D.BMP", 380, 150);
Sleeping of ESP8266 board
ESP.deepSleep(SLEEP_DELAY_IN_SECONDS * 1000000, WAKE_RF_DEFAULT);
Connections
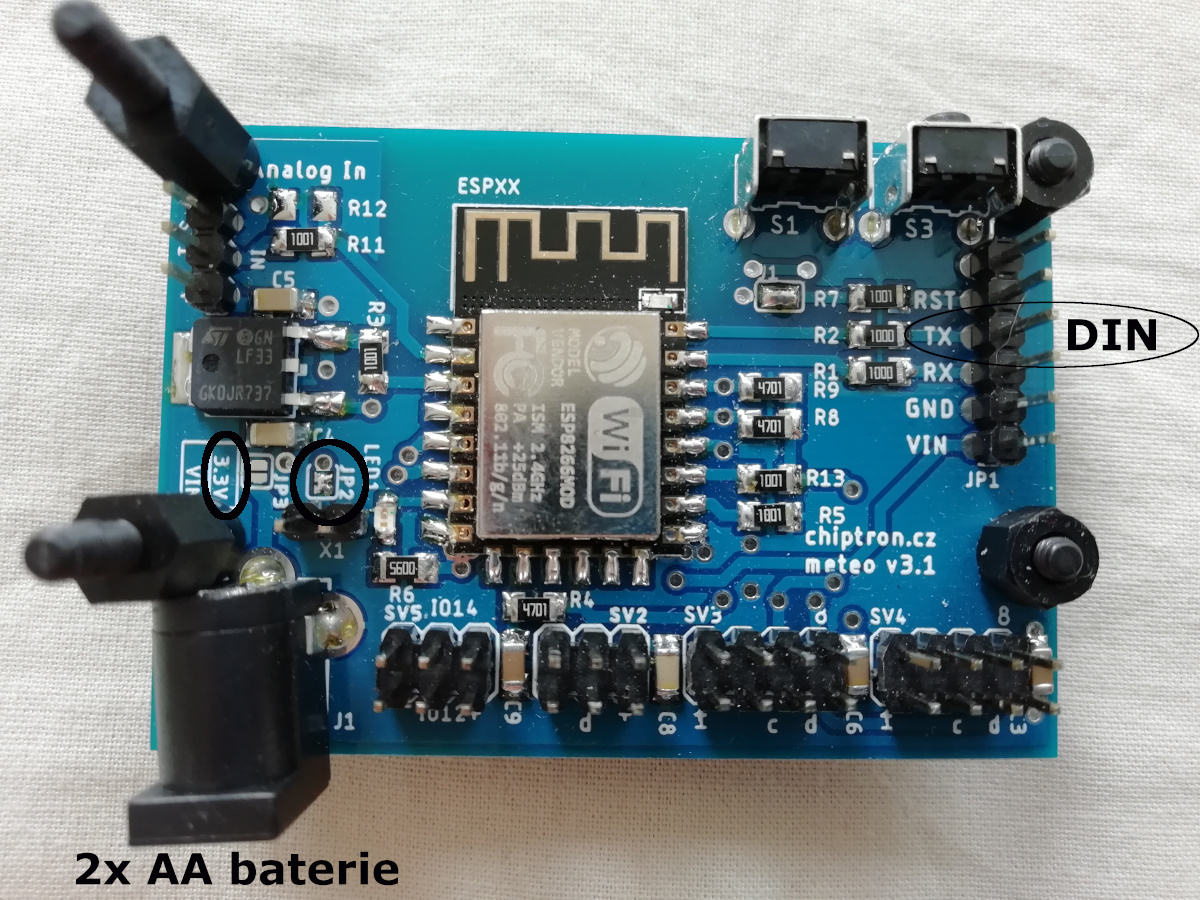
My conditions: the MeteoV3 is powered only from 2x AA or AAA batteries.
Thanks of this MeteoV3 board, the connection is really easy.
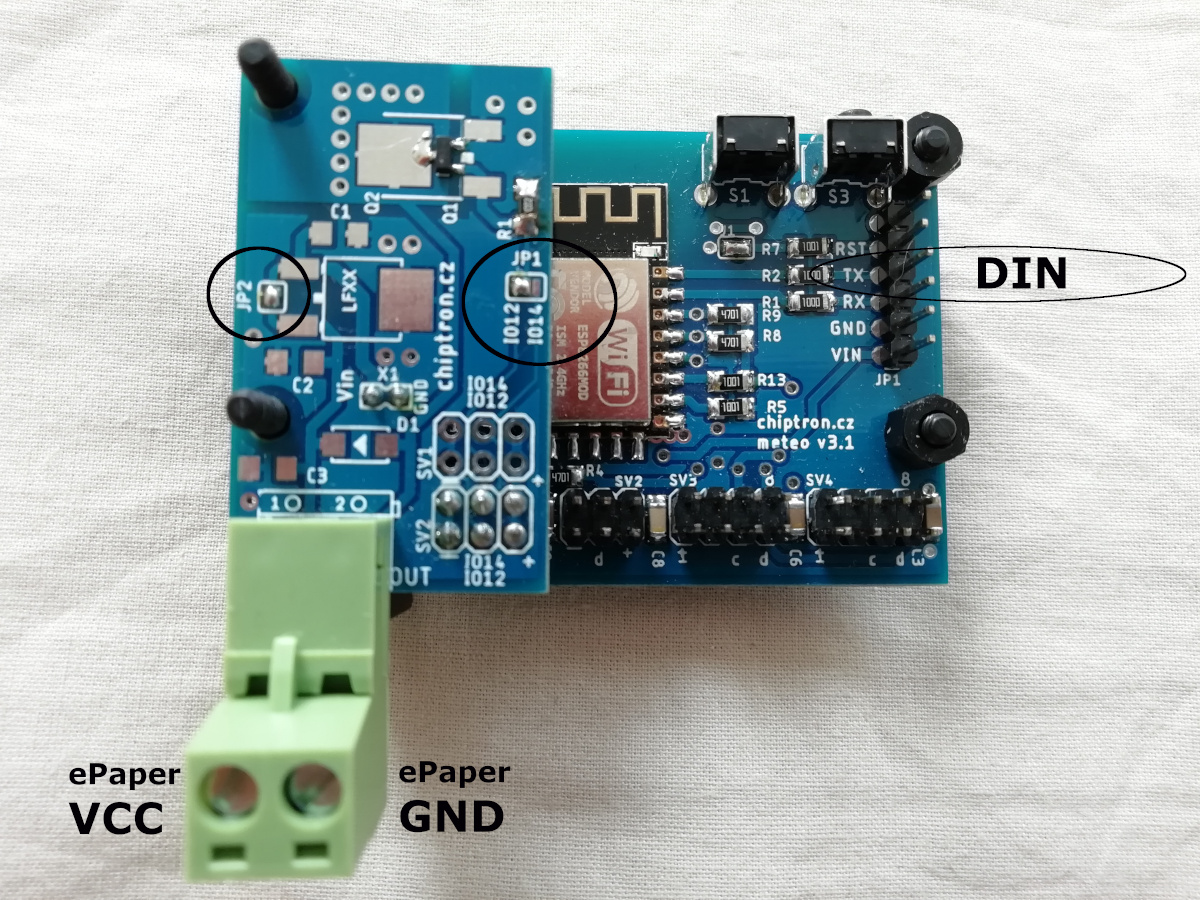
After the programming, connect TX of MeteoV3 to DIN on ePaper.
The power supply connected through PowerShield as following.
On the MeteoV3 board, solder the solderbrigde JP2 (labeled as 3.3V, the voltage range of ESP8266 is 2.7 - 3.6V) and then the input power supply is directly connected to ESP8266 and ePaper.
On the PowerShield, choose which GPIO you want to use for controling of power of ePaper (GPIO12[my case] or GPIO14) and solder JP2 on PowerShield - you connect VCC - 3.3V to the power input of ePaper.
Firmware
The firmware is available on github and you find there source code for ESP8266, where you can modify as you need.
If you did this project, share it with your friends!